Monday, May 31, 2010
Most Beautiful Blogger Award 2

Thursday, May 27, 2010
Just Add Ink #19 - Colour Challenge

I cut out 4 squares out of a sheet of cardstock to make my own window stencil...and then stamped my little people in their positions.I then stamped more of the little people on a separate piece of cardstock, cut them out and stuck them on top of the stamped people, to cover them up so when I coloured the background they wouldnt get colour on them.
I used my favs - "sponge daubers" to create the 3 colours in each box. I then lifted off the top layers of the people to reveal little one ones!
Now all was going well at this stage, until I lifted the window stencil to find that I had it crooked on the card (why didnt I fold the card AFTER this stage was done I dont know - you live and you learn I guess!)...so I cut each square out and stuck them onto a fresh Whisper White card using Dimensionals. I was so inspired by here that I just couldnt resist using these hot, funky colours. Of course I had to emboss the sentiment...LOVE embossing!
*My main camera lens has been broken and sent off to get fixed - and that was about 6 weeks ago....and I'm going crazy missing it! I've been taking my pics using my zoom lense which I find really hard cos I have to stand about 4kms away from my card and then try and hold camera and lense still when shooting to avoid the fuzz! Won't be long and my baby will be home!!!
stamps: all in the family, happy everything
ink: melon mambo, taken with teal, elegant eggplant, versamark, basic black, black stazon
cardstock: whisper white
dimensionas, stamp-a-ma-jig, clear embossing powder
Thursday, May 20, 2010
Just Add Ink #18 - Layout

I've impressed myself this week with getting this next wonderful Just Add Ink Layout Challenge done EARLY! Quite good I must say!
I'm seeing alot of Vintage Vogue over the last few weeks, but again, I just couldn't resist using it - I AM IN LOVE WITH IT!!! I have used "Emboss Resist", stamping with versamark then sprinkling white embossing powder, heating it, then using a sponge dauber I have "rubbed" Certainly Celery round and round and round until I got the look I wanted. I wiped off any ink that was on top of the embossing to expose the crips whiteness. I always love roughing up the edges of my cardstock, to give it a worn, loved look.
Check out the other really cool stuff the Just Add Ink Design Team have made! They're so amazing! I'm so proud of them!
cardstock: perfect plum, so saffron textured, whisper white
ink: versamark, elegant eggplant, certainly celery
accessories: white embossing powder, wire clip from clips assortment, dimensionals,
Thursday, May 13, 2010
JAI Blog Hop - Edges of Photos with Photoshop
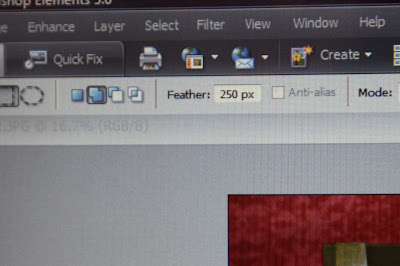
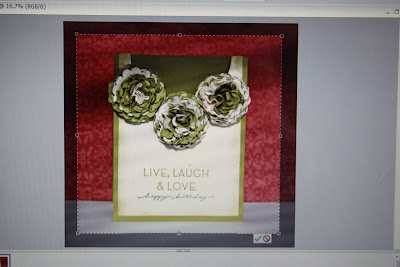
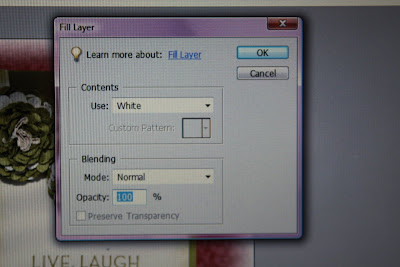
Hi! 1.On the Tool Bar on the right hand side, click on "Rectangular Marquee Tool" (the dotted square). You will notice at the Top Bar there is a few options of different shapes. I chose the square.
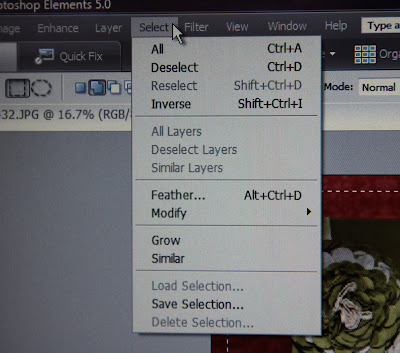
4. Go to SELECT tab at top of screen, and click "Inverse". This reverses what is selected by the box to include the outer edges of photo not included in the initial box.
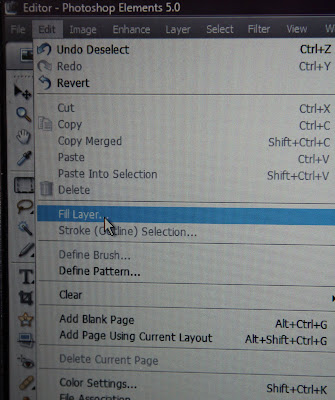
5. While your box is still highlighted, go to EDIT and choose "Fill Layer".
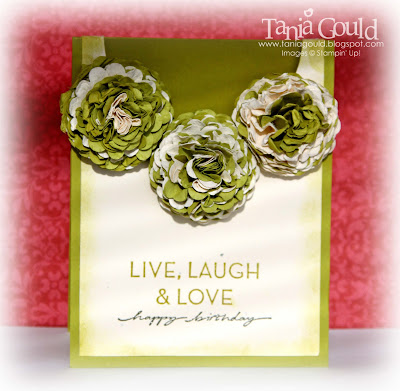
Sometimes I find that the edges isn't white enough like the photo above. I think this depends on the colours in the photo so I repeat the process. I draw another box, inverse it, fill selection white and deselect it again.
I hope this helps you with your photo editing! I personally think some cards really benefit from an effect like this on the edges and some others look better left alone - best to go with the flow and fiddle and see what YOU like best!Click on "Just Add Ink Blog Hop" to take you back to Just Add Ink and don't forget to check out the rest of the Teams fantastic tutorials again if you haven't already seen them!!!! Leave them a comment if you want - feedback is a friend! They are all so wonderful! I'm so proud to be part of such an amazingly talented team. By the way, how to make the flowers? Follow this perfect tutorial.
Tania
Charlotte Crafting and Girth Choc!
Here is my little precious doing some "crafts". It started because I was cutting out some butterfly's and she wanted to help but a wingless butterfly isnt so pretty so I stamped some things out for her and she decided she needed to colour them in - as any good kid would! I left her at my craft desk and she created til her heart was content - or until mummy spoilt the fun and said it was bed time!
Now, something else I wanted to show, my lovely friend sent me this for a belated Easter present and I just had to share with any chocolate lovers out there!
If you can't quite read it, it says:
"Girth Control Chocolate" and instead of the normal TradeMark (TM) symbol it says "YUM".
For Control of those unexpected urges.
DIRECTIONS: Simply break off the desired dosage and consume. You should quickly be overcome by stress-relieving endorphins and no longer concerned about 'those' thoughts.
WARNING: If you experience a hot flush, do not loosen clothing under any circumstances, as this may aggravate your condition.
IMPORTANT: THIS PACKET IS PROTECTED BY A TAMPER-EVIDENT PAPER WRAP. IF SEAL HAS BEEN BROKEN SUSPECT EVERYONE. GIRTH CONTROL CHOCOLATE IS HABIT FORMING.
For best results, consume frequently.
Check out their site www.bloomsberry.com. Love the "Core Range"!
Saturday, May 8, 2010
Most Beautiful Blogger Award
The rules are: pass on to another 10 Most Beautiful Bloggers AND tell you 10 things about myself! YAY!!! So here are "some" of the most beautiful bloggers:Bronwyn Eastley
Amanda Reddicliffe
Danielle Daws
Sarah Klass
Delys Cram
Nicole McMurtie
Chantell Randall
Kirsty Jeffery
Jeane McQueen
Naomi Jansen
And here is 10 things about ME!
1. I'm 31 yrs old
2. I have 1 daughter, Charlotte
3. I accidently killed a mouse last night.
4. I really really really want a new car. Had my little Lancer for 8 years, time to move on.
5. I hope to get chickens soon for the backyard.
6. I am a little too obsessed with Chocolate Coated Macadamias
7. I'm very thankful to be living in MY OWN house - no more renting.
8. I loved living on my parents farm for 2 years and miss the farm work so much.
9. I drink way too much Pepsi-Max. Still trying to cut down.
10. I wish things were different with my sister.
Friday, May 7, 2010
Just Add Ink #16 - Colour Challenge

This week, at Just Add Ink, there is a really stunning colour challenge, using the above colours.I have used...
stamps: bloomin' with beauty
ink: soft suede, pretty in pink, ruby red, so saffron & versamark
cardstock: soft suede, so saffron, whisper white
top note die, hemp twine, hodge podge, dimensionals, clear embossing powder
Check out all the other amazing entries at Just Add Ink!
Friday, April 30, 2010
Just Add Ink #15 - Layout

I love Flower Fusion felt flowers and dont use them near as much as I should. I wanted some little leaves behind these flowers and after going through all my sets trying to find the right leaf, I realised that the green felt flower cut in half made the perfect leaves!
cardstock: whisper white, basic black
ink: basic black
stamps: vintage vogue, happy everything
flower fusion
Thursday, April 22, 2010
Just Add Ink # 14 - VINTAGE

My inspiration came from reading lots of old-fashioned books and tried to replicate a ladies "Hat Box".......I'm really happy with what I've done this week.
- I stamped the rose in Pale Plum but wasn't happy with how pale and plain it looked, so instead of using a marker to add colour to the edges or edging the stamp in another colour, I inked a Sponge with Rich Razzleberry and inked the outer edges of the rose with that and then stamped. The effect was amazing - I wasn't expecting it. The two colours seemed to blend perfectly and gave a real soft effect. The top layer of the rose is Rich Razzleberry but stamped off once on scrap paper (versamark first then Heat and Stick powder then Dazzling Diamonds). Anyway, super happy with the effect I made with the two colours and using a sponge to do an effect similar to "rock'n'roll".
The Naturals Ivory cardstock got severely crumpled up into a ball several times and rubbed between my fingers to age it "100 years"! I then straightened it all out and was impressed how it actually looked like calico material in the end! I also aged the ribbon by soaking in Parisian Essense (then coffee cos I ran out of Parisian!)Thursday, April 15, 2010
Just Add Ink #13 - Colour Combo
I'm sooooo happy to show u my latest Scrapbook page - it sure has been a L O N G time between drinks (so to speak!). I've had this photo for a little while now but have been waiting for the right colour-inspiration to use and upon seeing this weeks JAI I knew I had found it!You may not be able to tell in the photograph, but I have put a little bead of Crystal Effects on each little Choc Chip flower in the border - so it has a real "touch and feel" factor to it.
NB: Please know that I do not make a habit of putting my precious daughter in front of fires just to take a picture! We were living on my parents farm and dad was burning some heaps so we met him there for a "lunch break". The flames are quite a distance from us so she was safe - never fear!!!
stamps: thoughts & prayers, live life like you mean it