How To Make A Gorgeous Rose
by Tania Gould
by Tania Gould
 STEP 1: Start with a square. Here, I used 3"x3".
 STEP 2: I like to cut the corners off my square rather than work with a perfect round circle - but both produce beautiful flowers so have a go at both!
 STEP 3: Crumple it into a ball. Unfold and crumple again. This softens the fibres and makes it soft and "loved"! I really give mine a good going-over, screw it up and roll it in my palms. The rougher the better! But make sure you dont tear it, of course!
 STEP 4: Next, cut a spiral shape starting at the edge and working your way into the centre. I like to cut a bit wonky on purpose, because it then gives shape and definition to the petals. Leave a bigger (wider) area in the middle as this will be the base of your flower where you can adhere to.
 STEP 5: Start rolling it up from the outside (where you first cut into). The tighter the first part is, the more tighter the "bud" of the flower will look. Keep rolling until the end.
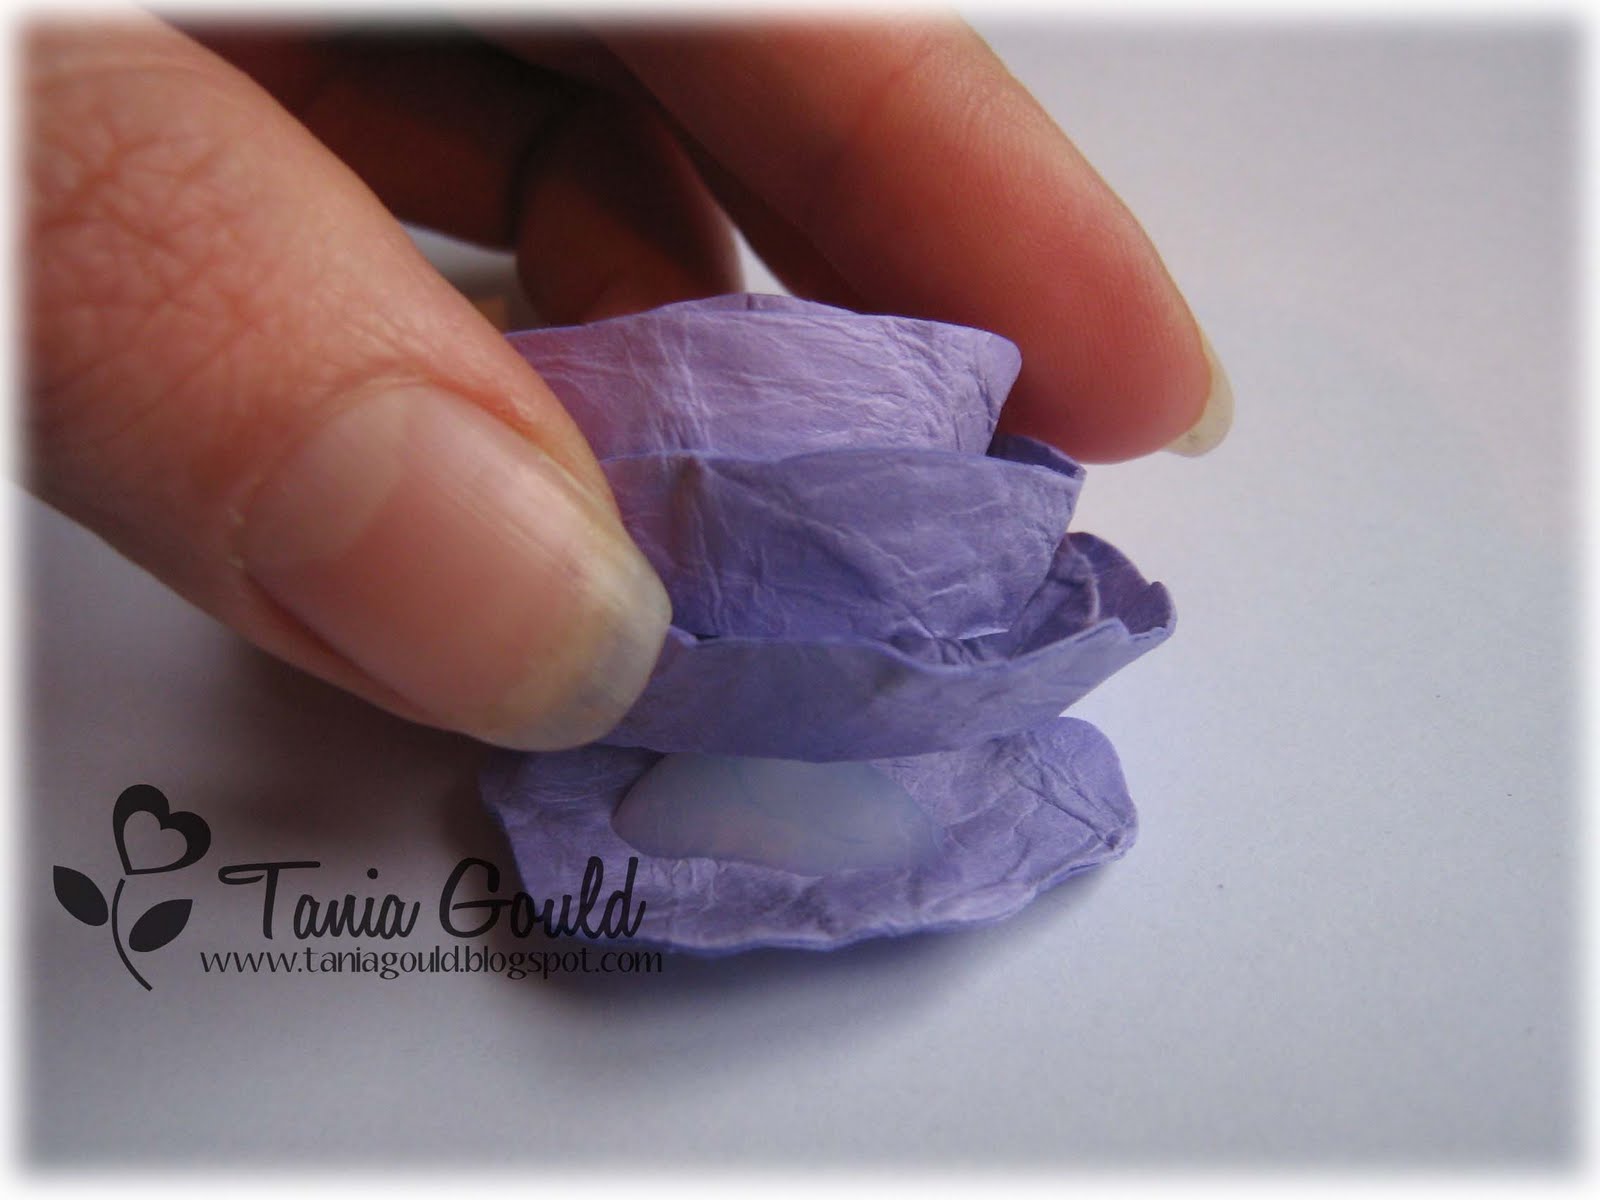 STEP 6: Once rolled up, gently let it go and it will "unravel" itself a bit so it looks more natural. You can fiddle with it to get it how you like. I even trim with scissors some of the petals if they are a bit wide in places.
I like to adhere the rose at the base by using Stampin' Up Crystal Effects. Squirt a generous blob on top of the base and under the rose and hold for a few seconds and then leave until it is thoroughly set. You will then have your beautiful rose!
 I have used this rose on my Twilight-inspired card here. Let me know what you think of my very 1st Tutorial and I would LOVE to see any future roses you make!
It is just so gorgeous Tania! Love it!
ReplyDeleteGardenia
Bookmarked!! Thanks heaps!
ReplyDeleteThe tutorial was easy to follow and the Twilight inspiration card just devine!
ReplyDeleteAwesome tutorial!! Love it!
ReplyDeleteGreat tutorial Tania - I will definaitely be trying this soon!! Thanks.
ReplyDeleteKim
Gorgeous, and much the same method as those little rose buds on my card (over on our NING site). Great tute Tania :o)
ReplyDeleteFantastic tutorial. The photos are great quality and make it so easy to understand..great job! Love your Twilight card too--so moody! Cheers!
ReplyDeleteA beautiful rose and your first tutorial was very good, easy to follow.
ReplyDeleteThanks for sharing.
Thanks for the tutorial, the flower looks fab.
ReplyDeleteRach:)
Your tutorial's beautifully photographed, and easy to follow - you did a great job! Sure is a gorgeous flower ... must give this a try. Thanks for sharing your idea :)
ReplyDeleteFab tutorial! Going to try this as part of the ESAD challenge this week! :)
ReplyDeleteGreat Tutorial...TFS
ReplyDeleteTerrific tutorial and a beautiful flower - I'm going to try this!
ReplyDeleteHere's the link for the card I made using your tutorial.
ReplyDeleteSo easy to follow!! Thanks! :-)
Amazing! I cant wait to try it out.....thanks heaps!
ReplyDeletethis is beautiful, thanks so much for sharing!! I'm off to CASE this!!!
ReplyDeleteGorgeous, will be trying it out tomorrow!! Thanks so much for sharing! Frances
ReplyDeleteI just found a link to your tutorial on a blog I was snooping ... wow what a great technique. Thanks so much Tania xo
ReplyDeleteAbsolutely awesome! Great tutorial, thank you for sharing!
ReplyDeletevery sweet. tfs ;-)
ReplyDeleteAbsolutely beautiful Tania! I made one and it worked! Thank you so much for sharing this tutorial. It was so sweet of you.
ReplyDeleteVicki, Phoenix, AZ, USA
oh, I LOVE it!!! It makes such a beautiful rose! I'm going to link this post to my blog at a4andie.blogspot.com :) Thanks so much for sharing!
ReplyDeleteThank you for the tutorial! I used this for inspiration for the one I made on my blog today.
ReplyDeleteThanks, again! I love your stuff!
Thank you Tania- just Gorgeous- will be using this.x Debi x
ReplyDeleteYou are not only talented, you are very kind to photograph and share your tutorials. Thank you so much!
ReplyDelete